Custom Post Types: CPT Manager
As of Ocean Pro Demos version 1.5.0, all OceanWP Pro Bundle license owners will be able to enjoy the OceanWP Custom Post Types (CPT) feature.
In order to be able to utilize the Custom Post Types feature on your website, you need to have the Ocean Pro Demos 1.5.0+ installed on your website and an active OceanWP Pro Bundle license.
Enabling Custom Post Types: CPT Manager
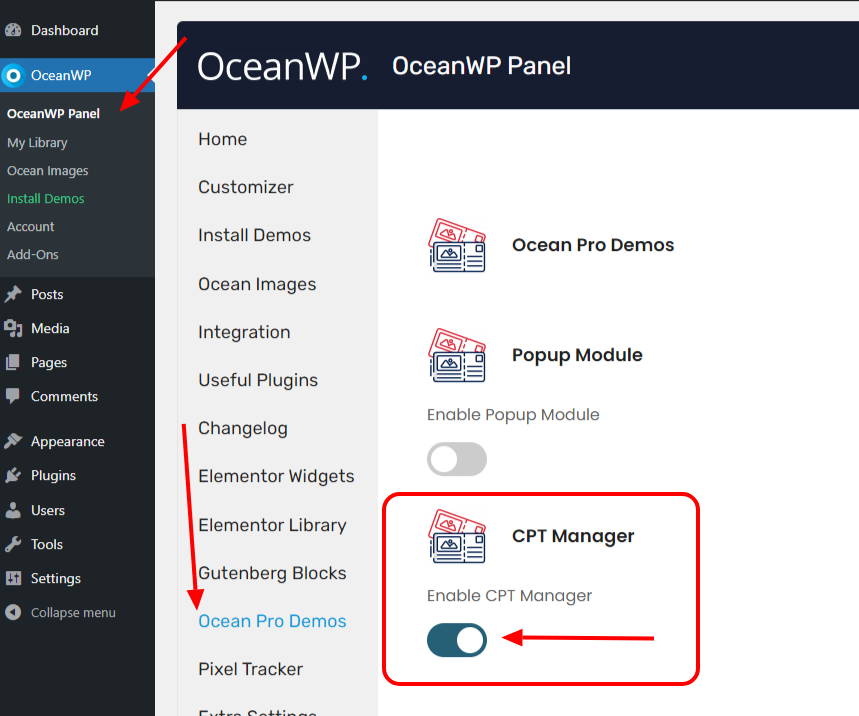
To enable the Custom Post Types on your website, you need to enable the CPT Manager:
- Navigate to your OceanWP Panel: OceanWP > OceanWP Panel > Misc Pro Features.
- Toggle the CPT Manager button to enable the feature.
- Refresh the page in the browser in order to see the new WP dashboard menu item.
- Navigate to the Ocean CPT WP dashboard menu item for more options.
Custom Post Types: CPT Create
Custom Post Types: Basic Settings
The CPT Create feature is used to create a new custom post type item. During this operation, you'll need to add necessary information:
- Post Type Slug (required): add a slug (to be used in permalinks) for your custom post type. Example: gallery.
- Plural Label (required): how do you want to call your CPT in a group? Example: galleries.
- Singular Label (required): how do you want to call the single item of your CPT? Example: gallery.
- Update Additional Labels from Singular Label button: this action will perform an auto-fill for the next chapter of necessary CPT settings. See the next chapter for more info.
Custom Post Types: Personalized Settings
The second batch of CPT settings serves to fully personalize your CPT, manage and customize all text labels associated with it:
- Description: describe the purpose of the CPT. Example: flower images.
- Menu Name: the name you want to be displayed in the WP dashboard for this particular CPT.
- All Items: label to be used for all your CPTs on the list.
- Edit Item: label to be displayed when editing a single entry item of the CPT in question.
- View Item: displayed on the frontend. Label used when someone is viewing single entry item of the CPT in question.
- Search Items: label to be displayed in the search bar for all CPT entries in question.
- Not Found: message to be displayed when none of the CPT entries match the search criteria.
- Not Found In Trash: message to be displayed when none of the CPT entries are found in the trash (deleted items).
- Parent Item Colon: text (symbol) displayed after the parent item name, using hierarchical CPTs. Example: Gallery: My Gallery. In this case ":" is the chosen parent item colon.
- Featured Image: label used for the featured image functionality, associated with your CPT.
- Set Featured Image: label for the button used to set the featured image for the CPT entry.
- Remove Featured Image: label for the button used to remove the featured image for the CPT entry.
- Use Featured Image: label that describes whether the featured image should be used along with your CPTs.
- Archives: label used for archive page(s) for your CPT entries.
- Add New: label for the button used to create a new CPT.
- Add New Item: alternative for the Add New label, with a slight emphasis on the Item aspect. Aka text that clearly describes to the person adding CPT they're adding a single entry of the CPT in question.
- View Items: label for the button used to preview all entries for your CPT.
- Filter Items List: label used for filter options available for your CPT.
- Items List Navigation: label displayed for navigation controls (pagination) for your CPT entries.
- Items List: label displayed for the overall list of your CPT entries.
- Attributes: label for any custom attributes associated with your CPT.
- Name Admin Bar: label which will display in the WP Admin Bar area for your CPT.
- Insert Into Item: label used for the interface element which serves to insert something into your CPT entry. Example, to insert media.
- Uploaded to This Item: label used for content which explicitly uploaded / added to the a specific CPT entry.
- Item Published: notification displayed when a CPT entry is published.
- Item Published Privately: notification displayed when a CPT entry is published but privately.
- Item Reverted to Draft: notification displayed when the status for a CPT entry changes from published to draft.
- Item Trashed: notification displayed when a CPT entry is moved to trash.
- Item Scheduled: notification displayed when a CPT entry is scheduled for future publication aka scheduled to be published at a specific moment.
- Item Updated: notification displayed when a CPT entry is updated.
Next in line of setting up CPTs is the Arguments.
Custom Post Types: Arguments
This section outlines configuration options that control the behavior of your CPT in WordPress:
- Public: determines whether your CPT is publicly available.
- Publicly Queryable: determines whether your CPT can be used / found / retrieved using WordPress queries.
- Show UI: determines whether to display admin interface controls to manage your CPT entries.
- Show in REST: enable or restrict access to your CPT entries through the WordPress REST API.
- REST Base: define the URL slug used to access your CPT entries through the REST API.
- REST Controller Class: advanced setting. Specify a custom class that handles REST API requests for your CPT.
- REST Namespace: advanced setting. Defines the namespace used for your CPT in the REST API.
- Has Archive: specify whether your CPT will have archive page(s).
- Show in Menu: determine whether your CPT will display in the WP admin menu.
- Show in Nav Menus: determine whether your CPT should be available for display / addition in WordPress navigation menus (Appearance > Menus).
- Delete with User: if selected, when you delete a specific user profile on your website, all CPT content the user has created (if any) will be deleted along with the user profile.
- Exclude from Search: excludes CPT content from search results.
- Capability Type: define capabilities for CPT actions (create, edit, ...).
- Map Meta Capabilities: advanced setting. Option that automatically maps meta capabilities to standard capabilities.
- Hierarchical: enable or disable hierarchical organization of your CPT entries (parent > child entry), similar to the organization for standard WordPress pages.
- Can Export: whether your CPT can be exported with the standard WP Export file (Tools > Export).
- Rewrite Slug: define the slug used for CPT entries.
- Rewrite with Front: advanced setting. Define whether Rewrite Slug should be prefixed with a specific string. Example: news/
- Query Var: advances setting. Define the query variable that's going to be used to access all your CPT.
- Menu Position: sets the CPT order in the WP admin menu.
- Menu Icon: sets the CPT icon in the WP admin menu.
- Custom Rewrite Slug: advanced setting. Define a custom URL structure for CPT entries.
- Custom Supports: specify additional functionalities for CPT. For example, comments.
- Taxonomies: assign existing WP taxonomies to categorize your CPT entries.
- Supports: define core WordPress functionalities support by your CPT entries. For example, title, featured image, etc.
Save Settings to create your CPT and store all previously applied settings.
Refresh the page after saving settings.
Custom Post Types: CPT Manage
If you want to edit (access all the settings explained in the Custom Post Types: CPT Create) or delete your CPT, access the CPT Manage option and select the desired custom post type.
Important: Deleting a CPT will also remove all content associated with that CPT.
Custom Post Types: Taxonomy Create
Your OceanWP Custom Post Types feature enables you to create custom taxonomies. There are 4 types of settings related to CPT taxonomies.
CPT Taxonomy Create: Basic Settings
Now, let's go over the very basic settings related to your CPT Taxonomy:
- Taxonomy Slug: the URL-friendly name for this taxonomy, like /categories/ or /galleries/.
- Plural Label: text used to display multiple terms within this taxonomy. For example: Categories, Topics, etc.
- Singular Label: text used to display the single term within this taxonomy. For example, Category, Topic, etc.
- Attach to Post Type: select post types where this taxonomy should be used to categorize items.
- Update Additional Labels from Singular Label: automatically generate other labels based on your Singular Label.
CPT Taxonomy Create: Additional Labels
Additional labels help you personalize and completely customize your CPT taxonomy:
- Description: optional text which describes the taxonomy or its purpose in the admin area.
- Menu Name: text displayed in the WP Admin Menu.
- All Items: text displayed on the main admin taxonomy page.
- Edit Item: text displayed on the edit screen for the single term.
- View Item: text displayed on the publicly available view page for a single term.
- Update Item Name: text displayed on the edit screen and in association with updating a single term.
- Filter by Item: text displayed above the filter dropdown menu on the taxonomy list page.
- Update Item: text displayed on the bulk action and in association with updating terms.
- Add New Item: button text displayed when creating a new entry.
- New Item Name: default name for the term name field when creating a new term.
- Parent Item Colon: text (symbol) which is used to separate the parent and child items.
- Parent Item: text displayed next to the select field for parent terms.
- Search Items: text displayed in the search option for terms.
- Popular Items: text displayed above the most frequently used terms.
- Item Link: text displayed next to the term's archive page link. For example, View.
- Separate Items with Commas: enable this option if you want to be able to separate multiple options in the edit screen with commas.
- Add or Remove Items: text displayed for the bulk action options for the term.
- Choose from Most Used: this option populates the edit screen with most frequently used terms.
- Not Found: text displayed when no results were found based on the search or filter use.
- No Terms: text displayed when there are no terms in a taxonomy yet.
- Name Field Description: optional text which is displayed below the term name field in order to provide instructions or guidance.
- Items List Navigation: text displayed for navigation elements on the term list page.
- Items List: text displayed above the list of terms on the admin page.
- Back to Items: button text which is used to get back to the main taxonomy list page.
- Term Name Field Description: optional text displayed below the term name field when editing a term.
- Term Parent Field Description: optional text displayed below the parent term field, used to provide guidance.
- Term Slug Field Description: optional text displayed below the term slug field, used to provide guidance or define its purpose.
- Term Description Field Description: optional text displayed below the term description field, used to provide instructions or guidance.
CPT Taxonomy Create: Arguments
The Arguments settings control how the terms within a taxonomy are accessed or controlled:
- Public: make terms visible on website's front end.
- Publicly Queryable: allow terms to be used in URLs for filtering content.
- Hierarchical: allow creation of subcategories within a taxonomy.
- Show UI: display a dedicated page for managing terms in the admin area.
- Show in Menu: include taxonomy in the WP admin menu for easy access.
- Show in Nav Menus: allow the term to be used in your navigation menus (Appearance > Menus).
- Query Var: name used in URLs to filter terms. For example, ?category=news.
- Rewrite: enable defining custom URL structure for term archives.
- Custom Rewrite Slug: specify a custom part of the URL (slug) which is going to be used for terms. For example, /news/ instead of /categories/
- Rewrite with Front: add a prefix before the term slug in the URL.
- Rewrite Hierarchical: enable URLs to reflect parent-child relationships.
- Show Admin Column: display the admin column for this taxonomy in the edit screen.
- Show in REST API: allow access to terms through the WordPress REST API. Advanced setting.
- REST API Base Slug: base path for terms in REST API. Advanced setting.
- REST API Controller Class: custom controller for handling terms in REST API. Advanced setting.
- REST API Namespace: namespace used for terms in REST API. Advanced setting.
- Sort: define how terms are sorted on the front and admin pages.
- Show in Quick Edit: enable term inline editing on the main edit screen (options that display when hovering over an item on the list).
- Show in Tag Cloud: include terms in WordPress tag cloud widget (Appearance > Widgets).
- Metabox Callback: specify a custom function to control how terms are displayed in the post edit screen.
- Default Term: specify a default term which will be assigned to new posts automatically.
Custom Post Types: Taxonomy Manage
If you want to edit (access all the settings explained in the Custom Post Types: Taxonomy Create) or delete your taxonomy, access the Taxonomy Manage option and select the desired taxonomy.
Important: Deleting a taxonomy will also remove all content associated with that taxonomy.
That's it!
Happy website building!