Pixel Tracker
As of Ocean Pro Demos version 1.5.0, all OceanWP Pro Bundle license owners with Business and Agency plans (annual and lifetime) will be able to enjoy the OceanWP Pixel Tracker feature.
In order to be able to utilize the Pixel Tracker feature on your website, you need to have the Ocean Pro Demos 1.5.0+ installed on your website and an active OceanWP Pro Bundle license (Business or Agency plan).
The Pixel Tracker feature enables you to add tracking options to your website, as well as choose which events exactly you'd like to track.
Enable Pixel Tracker
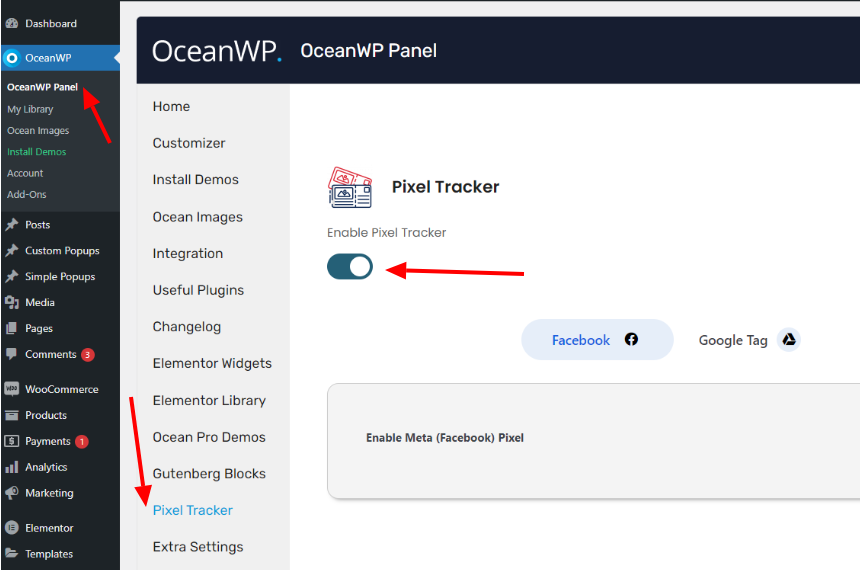
To enable the Pixel Tracker feature:
- navigate to your OceanWP Panel (OceanWP > OceanWP Panel),
- navigate to the Pixel Tracker menu item,
- toggle the option to Enable Pixel Tracker,
- refresh the page (in browser) if needed to view available options in the dashboard.
Important: In order to simplify things for you and make your user experience as smooth as possible, if you are using Ocean eCommerce Pro (Ocean eComm Treasure Box) on your website, you will view a notification message to use the Pixel Tracker feature through this plugin instead (Ocean eComm Treasure Box) in order to have everything in one place.
Pixel Tracker: General Overview
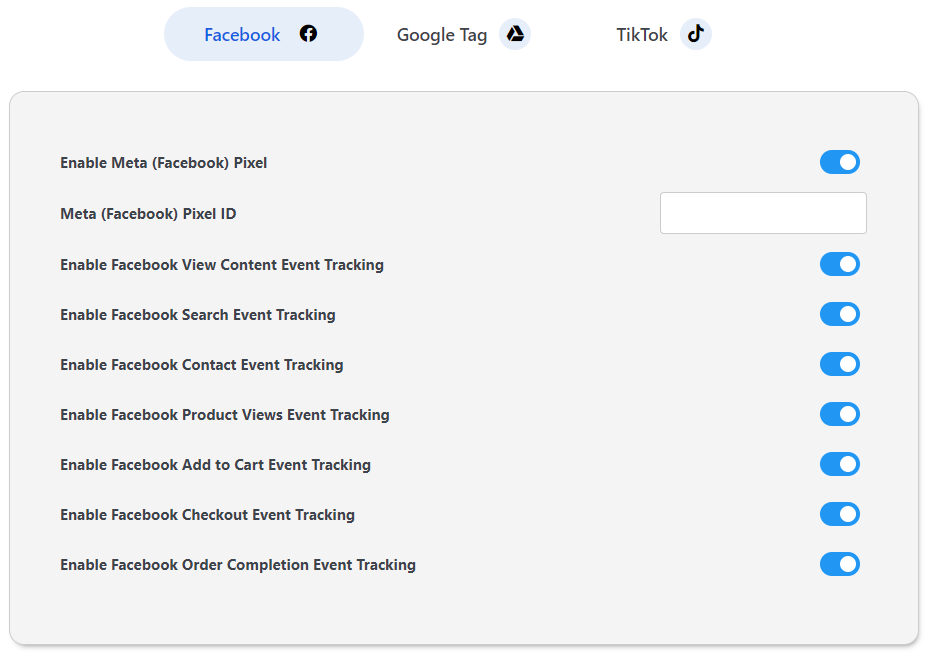
At the current moment, the OceanWP Pixel Tracker supports 3 options:
- Facebook (Meta) Pixel,
- Google Tag,
- TikTok Pixel,
- LinkedIn Insight Tag, and
- Pinterest Tag.
All trackers serve to track user behavior on your website. Though they may appear similar, there are a few slight differences.
Facebook (Meta) Pixel
Facebook Pixel primarily tracks user interactions for advertising and audience-building purposes on Facebook.
It sends data about website visitors to Facebook, enabling you to create targeted ad campaigns, retarget website visitors, and measure the effectiveness of your Facebook ads.
To obtain your Facebook Pixel, follow the official Facebook documentation.
Google Tag
Google Tag Manager acts as a container for various tracking codes, including Facebook Pixel, Google Analytics, and other marketing tools.
It allows you to manage all these tags centrally without modifying your website's code directly. GTM offers more flexibility in terms of what data you track and how you use it.
To obtain your Google tag, follow the official Google documentation.

Additionally, you can also use the Google Consent Mode option.
When enabled, this option will display an additional popup on your website, which will enable your customers to decline tracking. This feature will function only with the Google Tag.

TikTok Pixel
TikTok Pixel primarily tracks user interactions for advertising and audience-building purposes on TikTok.
It sends data about website visitors to TikTok, enabling you to create targeted ad campaigns, retarget website visitors, as well as measure the effectiveness of your TikTok ads, almost identical to the Facebook Pixel functionality.
To obtain your TikTok Pixel, follow the official TikTok documentation.

LinkedIn Insight Tag
Setting up your LinkedIn Insight Tag is identical to all other options explained above, depending on which events you'd like to track.
To obtain your LinkedIn Insight Tag, follow the official LinkedIn documentation.
Pinterest Tag
Setting up your Pinterest Tag is identical to all other options explained above, depending on which events you'd like to track.
The Pinterest Tag is available to Pinterest Business Accounts. To obtain your Pinterest Tag, follow the official Pinterest documentation.
Pixel Tracker: Settings Overview
Below, we have outlined the purpose of the same (shared) options though these are located in independent tabs:
1. Meta (Facebook) Pixel ID / TikTok Pixel ID / Google Tag Manager ID:
This is where you should enter the unique identifier provided by either Facebook or Google for your Pixel or Tag Manager account.
This identifier is essentially the connection between your website and the respective platform's tracking infrastructure.
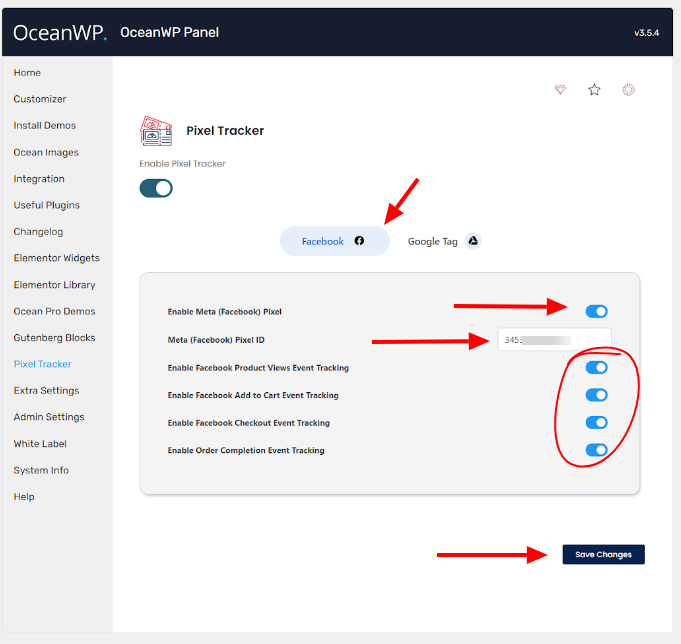
2. Enable Facebook Product Views Event Tracking / Enable TikTok Product Views Event Tracking / Enable GTM Product Views Event Tracking:
This feature is indispensable for tracking product views on your website.
It seamlessly sends this data to Facebook Pixel or Google Tag Manager, allowing you to analyze product engagement and optimize your advertising campaigns with laser focus.
3. Enable Facebook Add to Cart Event Tracking / Enable TikTok Add to Cart Event Tracking / Enable GTM Add to Cart Event Tracking:
This feature is an absolute must-have for any website. It enables you to track and monitor all the items visitors add to their cart.
By sending this valuable data to either Facebook Pixel or Google Tag Manager, you can accurately measure the effectiveness of your product pages and advertising campaigns in driving conversions. Don't miss out on this powerful tool - implement it right away!
4. Enable Facebook Checkout Event Tracking / Enable TikTok Checkout Event Tracking / Enable GTM Checkout Event Tracking:
Track visitor checkout initiation on your website and send this data to Facebook Pixel or Google Tag Manager. This will help you better understand user behavior and optimize your checkout flow for increased conversion rates.
5. Enable Order Completion Event Tracking:
This powerful feature tracks visitors' successful order or purchase completion on your website, providing you with invaluable insights into your conversion funnel.
By sending this data to Facebook Pixel or Google Tag Manager, you can accurately measure the ROI of your advertising campaigns and optimize your marketing strategy accordingly.
Pixel Tracker: The Next Step
The next steps depend on whether you want to use just Facebook Pixel or leverage Google Tag Manager for more control:
Using Just TikTok Pixel
If you've added the TikTok ID and enabled desired tracking events, you've already completed the basic setup. Now, head over to your TikTok Ads Manager to view reports based on the tracked events and use this data to optimize your TikTok ads.
Using Just Facebook Pixel
If you've entered a Facebook Pixel ID and enabled the desired tracking options, you've already completed the basic setup. Now, you can head to Facebook Ads Manager to view reports based on the tracked actions (product views, purchases, etc.) and use this data to optimize your Facebook ad campaigns.
Using Just Google Tag Manager
Configure GTM Tags: You'll need to create specific "tags" within GTM for each event you want to track (product views, add to cart, etc.).
These tags can be configured to send data either directly to Facebook Pixel or other platforms like Google Analytics.
Choosing between multiple tags
If your primary focus is Facebook and/or TikTok advertising and audience building, then enabling Facebook Pixel or TikTok pixel (or both) options in your "Pixel Tracker" would be sufficient.
Also, suppose you need more flexibility and want to track website activity for other purposes beyond Facebook ads. In that case, then enabling GTM and configuring the specific tracking events you need is a better option. GTM allows you to send data to various marketing tools, not just Facebook.
Remember that you can activate both Facebook Pixel and Google Tag Manager (GTM) using your OceanWP theme's "Pixel Tracker" feature for comprehensive tracking and centralized management. Utilizing Google Tag Manager may add complexity, but it also provides flexibility for data analysis and platform usage.
That's it!
Happy website building!